Tuesday, December 30, 2008

Let The Costuming Resume!

After devoting most of December to handcrafted Christmas presents for my family, I'm back to my costuming. It's definitely crunch time: I have a ball, a workshop, and Costume Con to work on, so I'm planning to devout quite a bit of time to sewing from now until May.
Just so you can see what I've been up to in December, here are photos of my family with their 'magic quilts.' The pillows unfold into quilted blankets. Above, my mother-in-law got a 'Provencal' style in blue. Everyone got a personalized quilt based off their hobbies and personalities:My sister-in-law got a kitty print pillow.
Her Husband got a hockey themed pillow
And my father-in-law (the LGB train nut) got a train themed pillow.

Right now my main focus is finishing the binding on my 18th century corset. I worked on it over the Christmas holiday (you can see my dog Caly dutifully assisting me), and I've been working on it in the evenings in front of the TV.
I just finished binding the top of the corset this evening: Of course, it's the easiest. I dread all those tabs on the bottom of the corset.
For those of you who have never used leather to bind your corset, I have to say I highly recommend it. My glover needle cuts through the leather like butter, and the leather stretches and conforms to the shape of the corset a lot better than normal fabric binding. There's the added benefit of having leather protecting you from any protruding reed bones as well. After my old corset, having a strong layer of leather in between me and the reed ends will be a welcome change.

Monday, December 08, 2008

Boning and Binding and Costume College

For some reason, despite the fact that I have rotated these pictures with my photo viewer, blogger refused to upload them without rotating them back to their original position. Sorry in advance for any cricked necks that may result from this post.
So I have finished boning my 18th century Stays. The Silly Sisters came through for me, and recommended that I replace the flimsy ash reed that just wasn't working with oval reed. What a difference that made! I feel like they're really starting to look like the real thing.Next up is binding the edges. I have 15 yards of fine white goat leather. I was apprehensive about binding the stays in leather since I had never worked with leather before, but I'm amazed at how easy the leather is to work with. I'm using a 'glover' needle, or a leather needle, which I'm sure helps. It is specially made to pierce the leather more easily. The problem I'm encountering is with my thread. My instructions recommend using silk thread, but the silk keeps raveling and bunching while I'm using it. Any ideas? Should I be waxing the silk before I start using it? I also have some more modern 'thread conditioner' I picked up at my local fabric store.As you can see I haven't progressed very far yet - I've been distracted with Christmas projects and preparations (I know, I know, excuses, excused). Overall, I think it will look very nice though. I'm using a backstick on the exterior binding, and a slip stitch on the inside. Once all the edges are bound, the lining and straps will get sewn in.

In other news, I have really got to crank up the sewing rate because I found out last week that I got a membership to Costume College (long weekend at the end of July/start August)! That means my Charles II mistress project is DEFINITELY on. I'll want to finish triming my 18th century Robe Anglaise before Costume College.

My sewing calendar for the next few months: finish my 18th century stays in time for my next Williamsburg seminar in January. I'll also need to bring a finished riding habit shirt and skirt (they seem fairly straight forward, and I'm not hand stiching them!). Then, in February, Gatsby's tavern is hosting George Washington's birthday ball, at which point my Regency Ball gown will make its debut. I would like to have an over robe in red velvet and a matching turban to go with it in time. Then, it's time for my Costume Con single pattern project, my vampire costume, and my secret masquerade secret. Hmm...any chance I'll get all of this done?? It's rather ambitious, but I'll give it my best shot!

Monday, November 24, 2008

The Amazing One Week Gown

Well, as usual my gown has made its "debut" without really being what I would call "finished." I went to an 18th century ball on Saturday night, and worked all week to get my gown to the point where I could wear it. Here I am earlier in the week, having finished the shell of my bodice. When I left the workshop last weekend I was pinned together, so I finished the seams on one side, and then used the finished product as a guide for finishing the second half of the bodice (which was never fitted since we ran out of time).
I was very happy with the way the back turned out. I love the little square formed by the shoulder straps and the nice point at the base of the bodice. And look at how well it's fitting...it's like it was made for me (*gasp*). The hardest part was repining the shoulder straps (Dave was a big help on this) and setting the sleeves into the bodice. Thank goodness for him, because my fitting double was pretty much worthless. My stays couldn't take the strain of squeezing the foam form (I apparently have more of a 'squish' factor than my foam form does).So here's the dress as I wore it on Saturday night. The fabrics match, so it's kind of hard to see, but there is an underskirt that is separate from the dress, and then an over skirt which is pleated and sewn into the bodice.One of the things I'll need to redo is the hem of the over skirt which is a bit too long in a few placed. Then I would like to trim the dress on the bodice and at the sleeve edges. I'm still debating adding a flounce to the under-petticoat, but there's something very nice about it's current simplicity.Here's the back. I'll need to hang the dress on my fitting double to make sure that something funny isn't going on with the pleats on the left side of the bottom point, but for the most part I'm very happy with how the over skirt pleated into the bodice.I took this shot from the side so you could see the silhouette that was popular towards the later part of the 18th century. I'm wearing a false rump. I tried my best to style my wig in the popular 'hedgehog' look. The silk ribbon in my hair is eventually going to be made into a belt for this outfit. I should still have enough leftover silk to use in my wig for a decorative touch.Just for fun, here's a photo of me in my cape, ready to walk out the door. I need to make a pocket for this outfit - I had nowhere to carry a camera, so unfortunately I don't have any pictures from the ball. There were some amazing outfits and wigs that I really wish I had photos of, but I'll just remember that for next time.

Sunday, November 16, 2008

Williamsburg Zone Gown Workshop

I went down to Williamsburg this weekend for yet another fabulous Burnley and Trowbridge workshop. For this workshop, we were constructing backs made out of four pattern pieces, and then fronts that were either sectioned or had drawstrings (like the late 18th century chemise dresses).
Here, I'm at work draping the back of my fitting partner's gown.These were the pattern pieces that when my partner draped the gown for me. A 'quartered back' or four pieces make up the back of the dress. This back style was the basic difference between the Robe Anglaise and the draping back of the Robe Francaise.Here's a photo of me once we finished draping the front of the dress.Finally it was time for pinning and fittings.Many of the dress pieces are simple pinned together at this point, but the back has been completely assembled and finished. This is what the back of the gown will look like (I'll cut a rectangle of fabric...probably 108 inches long, and pleat it until it fits into the dress. The skirt sews right onto the finished bodice).Here's what the front looks like. The stripes are supposed to do that - I didn't mess up when I cut them. You can see the line where they have been pieced together. I'm doing to cover that line with some trim to dress it up a bit. This is what I walked away from the weekend with - I have more sewing to do to finish up assembling the bodice, and the it's up to me to figure out the skirt and petticoat. I'm pretty confident I can do it.
The owner of the Silly Sisters was at the workshop, and brought a period gown from her own collection for us to look at. The stitches were amazing, and it was interesting to see how the seamstress worked with what she had, piecing where she needed to.Here is a close up of the trim. As usual, I love the pinked edges. How pretty! Amazing that it has survived for over 300 years.There is talk of beginning 1812 workshops so that we'll all be ready for the 200th anniversary of the war of 1812. In honor of this, we got to see a replica of early 19th century stays. Given how much trouble I had making mine, I might take this course if they decide to offer it.
There was lots and lots of inspiring costumes on display this weekend. I love this cap made out of silk gauze (what we could call organza today).
The color and detailing on this jacket and petticoat combination are simply gorgeous!
I especially liked the back - it's a pet-en-l'air with a hood. I had never seen that combination before.
Here is a quarter back round gown, worn by one of the ladies that works in the Milliner's shop in Williamsburg. I love the little detailing at the bottom of the dress and the sash.
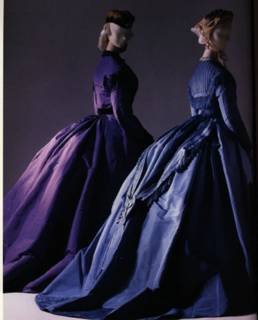
This gown has the drawstring front that was one of the options in this course. The gown is based off of a portrait that we were shown during the workshop - it's a dead ringer for the original, right down to the purple hem.
This is Janea Whitacre, Mistress and Mantua-Maker of Colonial Williamsburg, the teacher for this workshop. She's wearing a beautiful zone gown with a raspberry colored petticoat.I love how the stripes on the indian print cotton worked out in the back. The bunching that you see is because she is wearing the back bustled up. In the 18th century, this was called a gown "En Polonaise."
Sarah, the apprentice at the Milliner's shop, is wearing a chemise gown with a drawstring front. I LOVE the sash she is wearing. Her hair is styled in the fashionable 'hedgehog' style of the later 18th century.
On Sunday, Dave went to the museum in Williamsburg (somehow neither of us had ever made it there). He wound up on a once a week special tour of the historical fashion display and was very thoughtful and took pictures for me. Pictured above is an amazing stomacher - all the trim and detailing is just amazing.
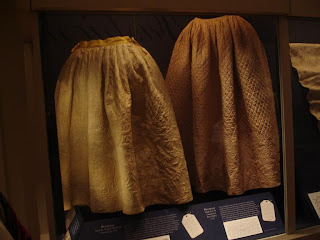
These are silk quilted petticoats (they would have been worn on the outside of the garment as a skirt...this was not an undergarment).
The green skirt under the red is quilted, but that is lost in the photo. However, I thought that the red gown was pretty.
Here is a quilted petticoat that is meant to be worn as an under petticoat (undergarment). The stays are a late 18th century style (one of the girls in my sewing group made this pair of stays in her own size). They give a bit more of a curve to the front of the body, instead of the ridged straight front that earlier corsets provided.This is an example of the ridged, full boned pair of stays that would mold your body into a triangle torso, and the front is ridged and flat. The keen observer will note that these are the exact pair of stays my blue 18th century stays were patterned from. I actually have the pattern pieces that would create this corset in the size shown here. Pretty neat, huh?
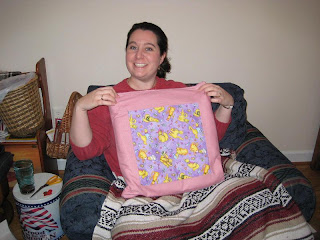
18th Century Stays Progress

I am continuing to work on the pair of stays from my September workshop. I was really hoping to get them done in time to take them with me to my Williamsburg dress workshop this weekend, but unfortunately the reed I ordered was all wrong and WAY too flimsy. I chatted with other workshop participants and know what to order now, but I was incredibly frustrated.
Here you can see I finished the eyelets. I am doing period correct spiral lacing instead of the traditional criss-cross that I have done in the past. It apparently really affects the fit of the garment, so I decided to stick with the period correct method.I did not hand sew all the channels on the corset (this would have been a year long project otherwise). A bit of work on the machine, but the pieces were all assembled with hand stitching.Here's the corset fully assembled after I sewed in all the boning channels. I had Dave lace me into it for one final test fit, and to mark where a few of the tab slits should go. And here's what it looks like once all the excess fabric has been trimmed away. Not bad, eh? All it needs in bones inserted, leather binding, and then I will line it.Here's what the inside looked like with all the excess seam allowance (this is in case you need to make adjustments to the fit..pretty smart method if you ask me).And here's the inside with the seam allowances trimmed to their final width.

Sunday, October 05, 2008

Yes, I'm Still here, and Still Sewing

Just a quick update to let you know that I AM still sewing, but preparations for my sister's wedding have slowed my progress somewhat, and I had to get my sewing machine serviced which put me out of commission for two weeks. The day I got my sewing machine back I finished Caly's Halloween costume (yes, it is sickeningly adorable when she puts it on, and no, Caly does not like wearing it). No pictures of her in the outfit until Halloween though!
I am currently working on a new set of 18th century side hoops. As I mentioned in my last post, the reeds in my panniers broke. Rather than repair the old set, I'm remaking them out of a stronger and period accurate cotton ticking. I have the fabric cut out, and all the pattern markings have been transferred. I just need to sew them up and order hoop steel tips. I'm using the same pattern since I really do like the shape they give my dresses. I highly recommend JP Ryan's pattern.

Monday, September 08, 2008

An Enviable Pair of Stays

I went to an 18th century workshop this weekend in Colonial Williamsburg to learn to make a custom fitted pair of stays (i.e. corset). It was the perfect indoor activity for a weekend of hard rain and wind courtesy of Hurricane Hanna. The workshop was run by Burnley and Trowbridge, and taught by Mark Hutter, the Tailor of Williamsburg. Mark brought all sorts of interesting goodies for us to look at - period tools, reproduction stays, and actual baleen (also referred to as whalebone). I had never seen whalebone before, and was fascinated to see it for the first time (and no, we were not using baleen as boning for our stays). The baleen is the black stuff below:

The Stays course was certainly a unique experience, which involved most of us standing around in only our near-transparent shifts for a good part of the day. I give Mark credit though - he was able to make jokes and put us all relatively at ease. We were each paired up with someone that had a similar body type, and we worked with our "Bosom Buddies," as Mark called them, for the rest of the day. We started by taking measurements in the 18th century method - using only a strip of paper and clipping little markings into the paper. No tape measures were used at all.
Next up was the most frustrating portion of the workshop for me. My partner and I chose a corset pattern that was recommended for our era and body types. We received about 10 minutes of oral instructions on how to size up an original 18th century stays pattern. Without any written instructions and no pattern drafting experience, this was a crash course in pattern drafting that had me going pink in the face with frustration. In the end with more than a little bit of help, all was well, though class ended a good hour and forty minutes later than it should have. I left the class on Saturday with pattern pieces chalked onto my corset fabric. Our homework was to baste the chalk outline of the pattern (and to secure all three layers of fabric together). I was a little surprised to learn that we were expected to hand sew (I had not gathered that from the class description). I went ahead and bought linen thread and beeswax to strengthen the thread, and got to work. The next day, we assembled the pattern pieces and wound up with the following product:
I know it doesn't look like much, but this is a PERFECTLY fitting corset, made especially for me. Mark actually sewed us all into our corset so we could be sure we had the right fit, and helped us make a few minor last minute tweaks. It's up to me now to chalk the final pattern, take apart the corset (it's only basted together), rebaste the chalk lines, hand sew the boning channels, insert the boning (I think I'll use ash reed), and bind the corset in white leather that I purchased this weekend. I think this is going to take a couple of months to complete, but I really want to take my time and get a perfect set of stays. If all turns out well, I may use some leftover silk taffeta to cover the corset and make it fancy.

Now, you can't expect a group of costumers to get together in Williamsburg without going out on the town in costume. We went to one of the Williamsburg taverns for dinner and had a great time. I know the photo above is dark, but I like the candle light effect.

Here we are in a bit more well-lit photo. The ladies on each end of the photo are members of my Tuesday Night Costumer's group.

BIG thanks to my husband for driving me down to Williamsburg. I know he enjoyed taking a tour of the local ale factory and playing WoW online in the hotel room, but I know it wasn't his preferred way to spend the weekend. Thanks Dave! Hope you're ready to go back up in November for the gown draping class. :)