Saturday, February 17, 2007

Finished Corset

The corset is all finished! When we left off, I was sewing in boning channels. Here's a picture of me inserting the boning:
And next I pinned on the binding to finish the corset's edges:

Next came marking the eyelet holes with washable ink:Then I used an awl to make eyelet holes:And then I sewed eyelets by hand for hours and hours. About six hours if I add up the movies I was watching in the background (Casino Royal, Harry Potter, and Memoirs of a Geisha). Thank goodness for the three day weekend!So here's the final product. The neckline is definitely doing what it's supposed to do:The fit is much better, though it's still not perfect. I can't figure out exactly what's wrong, but the bust line isn't fitting quite right, and the shoulder straps are too big or set too far out (you can see that they're wanting to inch to the left off my shoulders in the picture below). I'm not quite sure how to fix that.
Overall a pretty good fit. I hope it looks accurate underneath a regency gown. I'm concerned about the corset line on the bust showing through the gown, and what those straps are going to do...

Maybe the bodiced petticoat will resolve these issues. The only way to find out is to make up the petticoat!

Friday, February 16, 2007

Saved by Fabric Surplus!

My regency corset project continues thanks to an extra yard of cotton coutil in my fabric bin. I honestly have no idea where it came from. It must have been extra from another corset kit.

So, I've started the Corset over again, this time one size up. I think I've finally gotten the hang of putting in the gussets. I guess the first one was kind of like the rough draft (I know, I know, that's what the mock-up is supposed to be...but this project took two rough drafts).
I toyed with adding an additional hip or front stomach gusset, but in the end I felt that it wouldn't be needed. If the gussets made the corset too big at the hips it would be ruined. I can always go back and add a gusset later if I still need one (though it would really be a nuisance!).
The picture above shows the corset lining (in the front) and the outer corset (in the back) before I sewed them together. All of the bust and hip gussets seem to be lining up nicely. The gussets were an issue with the first version and I wound up having to reinsert most of the gussets. Here's the assembled lining and shell pinned together. Now I'm reinforcing the corset's seams using a technique known as 'stitching the ditch.' You sew the lining and the shell together by carefully stitching though all the layers along the seams. Here's an illustration:
Up next is adding the boning channels. Then come the dreaded hand-bound eyelets.

Wednesday, February 14, 2007

Alterations and Frustrations

The Regency Corset has been advancing at a fast pace. I tried on the lining one last time and decided that the bust gussets needed to be lengthened because the bottoms of the gussets did not reach the bottom of my bust. I ripped out the old gusset panels, drafted a new longer version of the gussets, cut deeper into the corset, and sewed in the new panels. The old gusset is on the right compared with the new longer gusset shown below. I'm pretty proud of this alteration, and the lining fits much better now:So the next step was to repeat the process with the satin coutil, sew the lining and satin coutil together, sew in boning channels, insert the boning, bind the raw edges of the corset, and finally comes the painstaking hand sewing of the lacing eyelets. It took me about three days to accomplish these steps (sorry...I didn't take pictures of this phase...I was excited to finish).

As soon as the last eyelet was finished, I begged Dave to lace me into the corset. The picture is horribly unflattering, but here was the final result (Check out Captain Picard in the background):
It may not be as visible from the front, but from the back it's clear that after all my careful fitting, the darned thing is one size too small. Regency corsets are designed to have a wider gap in the back...but my gap was a few inches beyond the intended gap. You can also tell if you look at the shoulder straps which are cutting into my shoulders because they're too far forward. On a more positive note, at least you can tell that the corset is doing what it was intended to do.
Although my bust line was rather...frightening.
Resewing the seams to try and size the corset up isn't a great option. I had a very small seam allowance to begin with, and the corset really needs to go up an entire size. I have enough satin coutil to sew a second corset, but I'll need more cotton coutil. I'll reuse the busk and boning. I plan to raid my fabric supply and make sure I don't have enough coutil from an old project laying around, and if not I'll have to reorder.

Monday, February 12, 2007

Regency Corset

Wohoo! I'm actually sewing again. I'm making up my Regency Corset (the pattern to the right). I did a careful fitting with the Swedish Interfacing, but I must admit I'm concerned about the fit. Corsets are rather difficult to fit since you have to squeeze the back together very tightly to see how well it's going to fit. My Swedish interfacing would rip if I squeezed it like that...so I measured and measured again. All that's left is to cross your fingers. Here's the made up lining in cotton coutil:
Many people make bodiced petticoats to get the regency look, but that isn't an option with my figure. Instead, I need to make the full Regency corset, complete with gussets, boning, and a busk up the middle. I'm using the Mantua Maker pattern which according to everything I've read on line is supposed to be the best. I'm using cotton coutil for the lining and the outer layer is satin coutil. The bones are all steel (not period, but I'm not interested in using cord or reed, and plastic boning won't hold it's form so it seems like the best alternative).
Here is another photo of the lining to give you an idea of the corset's shape. Katherine, another historical seamstress, has also sewn a corset from this same pattern, so you can see her version here for an idea of the finished product.

Sunday, February 11, 2007

New Toys

My trip to India and Christmas have helped build up my sewing supplies a bit, and I'm off and running again!! Here are a few of my new toys:
Swedish interfacing. I think it's better described as sewable tracing paper. Basically, I trace my pattern piece, cut out the tracing paper, and sew up the tracing paper to test the fit of the garment. If it doesn't fit, I haven't cut out my pattern (once you cut it you can't change the sizes very easily) so I just trace a different size and start again. Here you can see me using the Swedish interfacing pieces to cut out the fabric (which had earlier been sewn together to test the fit and then taken apart).
Meet my evil twin: Mini. This is a Uniquely You fitting form. I've borrowed the picture from the Uniquely You website instead of mine due to vanity issues...that, and I haven't fitted mine yet. It's made out of squishy foam and comes with a cover that zips over the foam. You fit the cover tightly to your body shape, and then zip it over the foam to create a duplicate of your body shape. The great thing about this dress form is that it squishes...so I can lace up a corset over the form and get the right shape/measurements.

The only problem with the fitting form is that the cover needs to be fitted: once the cover is fitted, it squeezes the foam into your shape. Unfortunately the reason I need a fitting double is because I can't fit things on myself. Which is why I ordered a fitting double. Which I now can't use because it has to be fitted. Harrumph. I will probably need to call in my highly trained fitting expert on this one (aka Mom).

Friday, February 09, 2007

Fabric Surplus

Get ready!! The sewing projects are coming!!!

Thanks to my trip to India, I now have all kinds of fabric for new projects. I can't purchase any patterns until after Christmas since a couple are on my Christmas list, but here is what I have purchased:
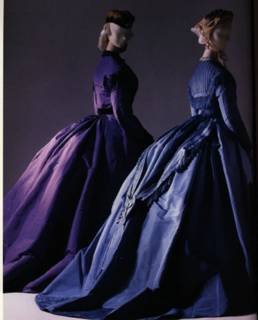
This pretty purple/blue fabric will be made into a civil war visiting dress, and I got a contrast peach fabric. I need to find almost 100 yards of ribbon for trim (!!) before I can make up the outfit. I already have a pattern for this one - it's a Simplicity pattern (#4510) that I haven't made up yet. Check out pattern 3855 while you're there...it's brand new and looks interesting. The Simplicity patterns all seem to fit very well so I expect it will go together fairly smoothly (knock on wood). I was thinking this would be great with my civil war bonnet.
This simple white silk will be made into a Regency day dress. I'm going to keep it very simple, and later on will make an overdress so it isn't just the stark white dress. I've always loved the picture of Madame Recamier, and this should be a close approximation. Plus, I have a new Kashmir embroidered shawl to go with the final product - it's going to look so period!
Next, I got a silk sari that will be made into a Regency ball gown. I bought the other silk before I saw this sari. If I'd know I was going to find the perfect white ball gown fabric, I might have purchased a different color for the day dress, but oh well. :) I'll put the border along the hem of the dress and use the heavily embroidered portion of the sari for the bodice.
Projects currently on hold are: Star Wars Padme nightgown, modern ball gown for the marine ball, and my Tudor dress. The Padme pattern pieces are so large, I'm going to have to cut up the pattern pieces in order to cut the fabric and I got a little intimidated by this. Both the ball gown and the Tudor dress need a lot of fitting rework, and I can't do that until I get a fitting double. The Tudor dress pattern is pretty disastrous (the fit was all wrong) so I'm thinking of ordering a new pattern. This pattern from reconstructing history just came out and is based off of the patterns in the Tudor Tailor. These costumes look amazing, and I would love to try them out.

**Please note that due to issues with blogger I was unable to attach any pictures to this post for the last several months. The original blog was written before Christmas, and the blog content is somewhat out of date. The seamstress apologizes for the technical delays which have since been corrected with the newest version of blogger.