Well, as usual my gown has made its "debut" without really being what I would call "finished." I went to an 18
th century ball on Saturday night, and worked all week to get my gown to the point where I could wear it. Here I am earlier in the week, having finished the shell of my bodice. When I left the workshop last weekend I was pinned together, so I finished the seams on one side, and then used the finished product as a guide for finishing the second half of the bodice (which was never fitted since we ran out of time).

I was very happy with the way the back turned out. I love the little square formed by the shoulder straps and the nice point at the base of the bodice. And look at how well it's fitting...it's like it was made for me (*gasp*). The hardest part was repining the shoulder straps (Dave was a big help on this) and setting the sleeves into the bodice. Thank goodness for him, because
my fitting double was pretty much worthless. My stays couldn't take the strain of squeezing the foam form (I apparently have more of a 'squish' factor than my foam form does).

So here's the dress as I wore it on Saturday night. The fabrics match, so it's kind of hard to see, but there is an underskirt that is separate from the dress, and then an over skirt which is pleated and sewn into the bodice.

One of the things I'll need to redo is the hem of the over skirt which is a bit too long in a few placed. Then I would like to trim the dress on the bodice and at the sleeve edges. I'm still debating adding a flounce to the under-petticoat, but there's something very nice about it's current simplicity.

Here's the back. I'll need to hang the dress on my fitting double to make sure that something funny isn't going on with the pleats on the left side of the bottom point, but for the most part I'm very happy with how the over skirt pleated into the bodice.

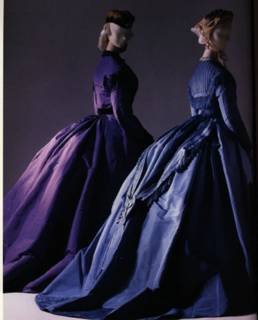
I took this shot from the side so you could see the silhouette that was popular towards the later part of the 18
th century. I'm wearing a false rump. I tried my best to style my wig in the popular 'hedgehog' look. The silk ribbon in my hair is eventually going to be made into a belt for this outfit. I should still have enough leftover silk to use in my wig for a decorative touch.

Just for fun, here's a photo of me in my cape, ready to walk out the door. I need to make a pocket for this outfit - I had nowhere to carry a camera, so unfortunately I don't have any pictures from the ball. There were some amazing outfits and wigs that I really wish I had photos of, but I'll just remember that for next time.
 I was very happy with the way the back turned out. I love the little square formed by the shoulder straps and the nice point at the base of the bodice. And look at how well it's fitting...it's like it was made for me (*gasp*). The hardest part was repining the shoulder straps (Dave was a big help on this) and setting the sleeves into the bodice. Thank goodness for him, because my fitting double was pretty much worthless. My stays couldn't take the strain of squeezing the foam form (I apparently have more of a 'squish' factor than my foam form does).
 So here's the dress as I wore it on Saturday night. The fabrics match, so it's kind of hard to see, but there is an underskirt that is separate from the dress, and then an over skirt which is pleated and sewn into the bodice.
 One of the things I'll need to redo is the hem of the over skirt which is a bit too long in a few placed. Then I would like to trim the dress on the bodice and at the sleeve edges. I'm still debating adding a flounce to the under-petticoat, but there's something very nice about it's current simplicity.
 Here's the back. I'll need to hang the dress on my fitting double to make sure that something funny isn't going on with the pleats on the left side of the bottom point, but for the most part I'm very happy with how the over skirt pleated into the bodice.
 I took this shot from the side so you could see the silhouette that was popular towards the later part of the 18th century. I'm wearing a false rump. I tried my best to style my wig in the popular 'hedgehog' look. The silk ribbon in my hair is eventually going to be made into a belt for this outfit. I should still have enough leftover silk to use in my wig for a decorative touch.
 Just for fun, here's a photo of me in my cape, ready to walk out the door. I need to make a pocket for this outfit - I had nowhere to carry a camera, so unfortunately I don't have any pictures from the ball. There were some amazing outfits and wigs that I really wish I had photos of, but I'll just remember that for next time.


4 comments:
Make hanging pockets - they're awesome!
I've been watching a kit on eBay for $13. It comes with embroidery instructions. I've been thinking about making hanging pockets for a while...
Great dress, you look amazing!
Fabulous! I can't believe you got so much done in a week. I love the research you've done on period clothing and especially that you provide photos, so us lay people can understand what you're teaching us.
Post a Comment